18 December 2011

Merry Christmas

Dark Chocolate Chips Cookies

Cookies in Jars

Cookies in Boxes

Dark Chocolate Brandy Truffles

Merry Christmas 2011
Hello, Everyone
 
Santa is coming to town soon. It’s time to organise your Christmas presents and send them off to your beloved ones. My families are in Taiwan and New South Wales. From the kitchen of bakingmama, the edible presents must survive in distance.
 
That’s the reason I have baked the super chewy “chocolate chips cookies”. This is going to be a new hit amongst my family and friends. You can eat it with a glass of milk or a pot of tea. The chocolate chips are half 53% and half 70%. It’s mixture of bittersweet indulgence. Paul and I think it’s really sexy.

The cookies are beautifully wrapped in the jars for family; and in the beautifully Christmas themed baker’s boxes for friends.
 
Please visit “Chubby’s Crafty World” to see our handmade Christmas presents and cards.

~~~
I want to say that I am counting my blessings to have my beloved family, friends and devoted fellow bloggers.

Have a very Merry Christmas and a wonderful New Year. I love you all.
~~~
 
Thank you for stopping by.
Happy baking~
Beth xoxo

27 November 2011

Giant Cupcake Cake


Happy 8th Birthday, Emma
Emma is a sweet little girl who is always looking after the younger siblings as well as a great helper amongst uncles and aunties. Instead of making her the normal sized cupcakes, I created a giant cupcake cake to surprise her on her 8th birthday.

There are different ways to make a giant cupcake cake. For the base, I was using the Wilton giant cupcake cake tin and the Pyrex glass baking bowl to create the round top.

The base of this 3D giant cupcake cake was covered in pastel pink fondant with a white ribbon strip and a bow. The top of the cake was covered in dark chocolate fondant with pastel pink and blue cachous. A red polka dot candle replaces a gum paste number 8 (which I made but not dried prior to the party).

The cupcake was chocolate cake with dark chocolate ganache. All guests’ eyes were lighting up when they saw a giant cupcake cake being brought to the table. I know it was a hit.

Thank you for stopping by.
Happy baking~
Beth xoxo

23 November 2011

Pumpkin Spice Chiffon Cake

Pumpkin Spice Chiffon Cake
I have some leftover pumpkin from my cooking last night. Normally, it will take me forever to use it. This morning, I have steamed the pumpkin and made some purees for this cake.


It’s called “Pumpkin Spice Chiffon Cake”. The recipe is generously shared by Samantha Johnson of Caketopia.
Honestly, I am not good at the chiffon cakes. There is a technique called “folding”, which to me is the hardest one and the result will affect the presentation and taste of the cake. As a first timer for this recipe, the cake turned out great as it’s light, moist and delicious. It is very healthy as it contained no butter or oil. I cannot wait to share with my family and friends.

Thank you for stopping by.
Happy baking!
Beth xoxo

28 October 2011

Make Up Box

Makeup Box Cake

Photo by Claire

This is the perfect gift for makeup artists and all girls that love being a girl! That’s what Mummy Claire does – a professional makeup artist and a lovely mum of two beautiful children – Emma and Daniel.

The design of the cake came from the Planet Cake book. It’s in the shape of a makeup box with two little eye brushes out of gum paste. I also created three nail polish bottles and one sexy red lipstick to complete the look.

The flavour was chocolate cake with Oreo milk chocolate ganache as Emma and Daniel love chocolate a lot; especially my Belgian ones.

===


Dearest Claire

I look forward to enjoying our friendship for many more of your birthdays.
Happy birthday to you~


===
Thank you for stopping by!
Happy baking~
Beth xoxo

23 October 2011

Elmo Dessert Table

Elmo's Dessert Table For Hannah
The Castle Cake

baking papa helped to create the cake pops

Elmo's Cupcakes For Hannah

Vanilla Flavoured Cookies

Chocolate Dipped Marshmallows


Jaffa Chocolate in the Jar

Hi Everyone
 
My goddaughter had an Elmo theme party for her 2nd birthday. Her mum, Vicky had involved me to create an unforgettable celebration for her.
 
Here they were the cake and the desserts I created for her:

Castle Cake: I always wish to create a castle cake for my baby girls (i.e. my niece, and goddaughter). I love the idea of pink and blue colours for the castle itself. In order to match the theme of this party, I created the Elmo figurine to sit on the cake board. The flavours of the cakes were the “Caramel Chocolate Mudcake” with “Caramel Chocolate Ganache” & “Vanilla Cream Cake” with “Caramel Chocolate Ganache”.

Cookies: I made some vanilla sugar cookies. For the face, I used a round cookie cutter. I rolled two balls with the white sugar paste and the black sugar paste the eyes. And, I made the nose with a round ball of orange sugar paste. For the mouth, I used half of the chocolate button.

Cupcakes: My beloved family don’t like the sweetness of the “buttercreams”. Hence, Elmo cupcakes were made of vanilla butter cake with dark chocolate ganache and fondant icing face of Elmo topper.

Chocolate Dipped Marshmallows: When Vicky and I discussed the desserts we were going to serve; I have come across the jumble marshmallows in the supermarket. I knew I had to make them with my super delicious Belgium chocolate. It is simple and so pretty for the dessert table. Love them.
 
I always like to have some decorations over head too, to fill the empty space above the table, so use red paper lanterns or decorative pom-poms and add Elmo's eyes and face using cardstock. For more information, please visit http://www.chubbyscraftyworld.blogspot.com/

Thank you for stopping by~
Happy baking!
Beth xoxo

02 October 2011

Pumpkin & Date Cake


Happy Birthday, Emily
Hi Everyone

What was your baking project during the weekend? I baked this “Pumpkin & Date Cake” for my dearest friend, Emily’s birthday. This is a great recipe because it’s hearty cake for your beloved ones whom don’t like “icing” or “sweets”.

The cake is so delicious and healthy because the natural sweetness of the pumpkin. When you serve the cake, you can spread with salted butter if desired.

The recipe comes courtesy of Wendy Torpay of Nelson Bay, NSW from The Australian Women’s Weekly. This is the second time I baked it and it is really a good and easy recipe for the beginner. Here are the ingredients and how’s to.

Ingredients:
400g peeled, chopped coarsely pumpkin
220g brown sugar
140g chopped coarsely dates
½ cup vegetable oil
300g self-raising flour
1 teaspoon bicarbonate of soda
1 teaspoon ginger
1 teaspoon allspice
2 beaten lightly eggs

How’s to:
1. Steam the pumpkin until tender; mash. Cool to room temperature
2. Preheat the oven to 1800C. Grease a 20cm round cake tin; line the base and side with baking paper
3. Combine the mashed pumpkin with the remaining ingredients and mix well
4. Pour into the prepared cake tin
5. Bake for 1 hour or until cooked when tested

~~~
Dearest Emily

Once a year I get the chance to wish you birthday cheer.
It pleases me no end to say, I wish you another great year.
Happy birthday to You!
~~~

It’s time for you to try. Thank you for stopping by, everyone!

Happy baking~
Beth xoxo

25 September 2011

Maisie Parrish's Masterclass


Maisie and Beth

Focusing on Modelling A Knee

Mechnical Techniques with Maisie

Mini Cakes with Maisie


Maisie and My Retail Therapy Cake

I have done it.

Thank You So Much, Maisie
When I saw Maisie, "I was star struck". To any cake decorators, she would be a big celebrity or star to them. Each day, she welcomed me with her famous smile. I still can't believe it had happened to me actually.

I am a very lucky girl to spend 4 days with Maisie and the other girls that are outstanding in the cake decorating world.

Maisie as the Queen of character modelling taught me how to create different characters and all techniques to create the gorgeous retail therapy cake at the end.

It's hard to say goodbye yesterday as I had tears in my eyes when I packed up and said goodbye to her. She is going back to England tonight. I wish her a great trip and I can't wait to see her again next year.

Thank you for stopping by.
Happy cake decorating!
Beth xoxo

20 September 2011

Cake For Vicky & Lina


Happy Birthday, Vicky & Lina


V For Vicky & L For Lina

Handmade Flowers
Hi Everyone,

My latest cake is this two tiered cake for my dearest friends Vicky and Lina whom share the same birthday. I wanted something sophisticated and modern to celebrate their big day together.

The flavours of the top tier were “white chocolate mud cake” and “dark chocolate mud cake” with “chocolate wheaten biscuits ganache”. The flavour of the bottom tier was “white and dark chocolate swirl mud cake” with “dark chocolate ganache”.

The geometric design of polka dots and diamond patterns is so versatile. Two peony roses decorated the front of the cake for a modern yet soft look. The board was embossed with the rose cutter and two bullet candles added for them to make a wish or two. The inspiration came from Cake Picture Gallery.

~~~~~~~~~~

Dear Vicky & Lina

I wish you both a lovely day, not just today because it is your birthday, but all year round. May you always wake up in the morning with a smile on your faces.

Happy Birthday to you x 2. :-)

~~~~~~~~~~

Thank you for stopping by, everyone!


Happy baking~
Beth xoxo

09 September 2011

Lavender Lemon Cupcakes

Lavender Lemon Cupcakes
We went to a beautiful lavender farm in Kingaroy, Queensland last month. I have bought some cooking lavender buds for my baking.

As my baby goddaughter is coming over to spend some times with us tonight; I thought I have a treat for her after dinner.

This delicious healthy dessert is the combination of using the dried lavender buds, lemon juice and lemon zest. This beautiful recipe is by an inspirational author named "Tamara Jane".

I will also make the 'sweet corn thick soup with puff pastry' for her. I will post it on my facebook later on.

Thank you for stopping by!
Happy baking~
Beth xoxo 


05 September 2011

Chocolate Bread

Homemade Chocolate Bread
Hello, everyone

This is a very basic bread recipe from the book I just bought - "Common Sense Baking" by Murdoch Books.

I followed the recipe carefully but only changed a little bit while baking to create the crunchy crust outside. You can see from the photo that the bread is still soft inside. To do so, you simple need to spray water every 15 minutes when it's in the oven. 

The chocolate bread was delicious but I think it's slightly bitter for young children. I will use 53% dark chocolate next time instead of 70%. If you do try or have tried before, please let me know if it's sweeter. It is great to eat this chocolate bread with homemade whipped cream and jams; which is exactly what I am doing while writing this story. 

Thank you for stopping by!
Happy baking~
Beth xoxo

28 August 2011

Wii Console Cake

Happy Birthday, Shin Yih

Wii Console Cake
Are you young in heart? Our friend – Shin Yih is. A father of one beautiful baby girl, Hannah who takes his Wii games seriously. I thought I would keep it simple the first time I tried to make a console cake for his birthday.

I baked two 6” square cakes Jaffa Mud Cake, which allowed me to double the size from the real life Wii console. I think this cake is a combination of guilty pleasures and edible fun. It is complicated but I am pretty happy with the result at the end.
 
=====

Dear Shin Yih

Happy birthday on your very special day.

=====

To everyone, thank you for stopping by!
Happy baking
Beth xoxo

21 August 2011

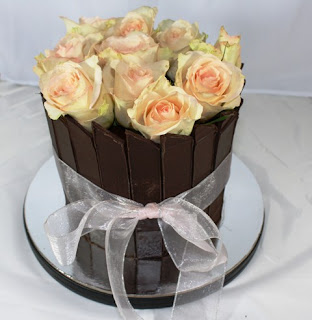
Dark Chocolate Panel Cake

Cakes by JudyC
I went to join Judy, the owner of Cakes by JudyC on Sunday to create this beautiful decorated Chocolate Decadence Cake.

The top of the cake was decorated with the fresh roses or you could top with your own sweet treats on your cake later on. Well, another creation that I can’t easily cut through it just by its beauty.

The flavours were “White Choc Mud Cake” and “Dark Choc Mud Cake”.

Thank you for stopping by.
Happy baking~

Beth xoxo

19 August 2011

First Topsy Turvey Cake

Happy Birthday, Claire

A two tier topsy turvy cake for my dearest friend, Claire.

Inside the bottom tier is the chocolate banana cake with milk chocolate ganache covered by the dark chocolate ganache. Inside the top tier is the chocolate mudcake & Bailey with milk chocolate ganache covered by the dark chocolate ganache.

The cake is covered in pink and white fondant; decorated with chocolate and white fondant strips and pearls.

The topper is a white pastillage Mardi Gras mask embossed with non-edible feathers, pearls and diamante rhinestones. Not shown in the photo are some blossoms at the back of the mask to hide the support.


The mini emblishments are made from several molds covered by 24K edible gold leaf.


Details

=====
Dear Claire
We know we are getting old when the only thing we want for our birthday is not to be reminded of it. I just want to say: enjoy the night of the celebration and the cake.  Happy Birthday to you.
=====

For all, thank you for stopping by.
Happy baking
Beth xoxo

26 July 2011

Simply Bake A Cake & Eat It Day

Mum Goodwin's Chocolate Cake
 This morning, I woke up feeling like having some cakes. Family and friends have been asking me about baking. Here they are; this is what I do when I simply bake a cake and eat it. Please bear in mind; this is the entry level instead of the advanced one. Hope you can learn a tip or two from the steps.


1. Do the Researches:
I will Google a recipe or pull out all my cake books – if the photo shows a delicious looking cake or has a good review, I will go and bake it. It doesn’t apply to the luscious novelty cakes I am making. They are tested recipes from the professional cake artists in Australia. This will go further in relation to the level of attitudes. Let’s just keep it simple here.


Google is the cost effective way to bake from scratches. For me, I love to know how the other professional cake artists bake. This allows me to improvise and adapt to a great recipe of such my family and friends would definitely enjoy.


I don’t bake from the cake mix. First, I do not know what ingredients are in the mix and they are overly sweet to us, although it does guarantee it will turn out a 100% good looking cake.


* Today, I am baking a chocolate cake I saw on the Food Network by Julie Goodwin (The Australia First Master Chef). I haven’t bought her book yet but someone generously shared the recipe on the Internet. I may buy the book if this cake turns out as good as it looks in the photo.


2. Baking Tools:
This is the prep list that you can find in the supermarkets. Again, this is a list what I can’t bake without them. Different people will have different tools they need in the kitchen.
My Baking Tools
A. Measuring spoons – you can measure salts, baking powder etc
B. Dry ingredient measuring cups – you can measure flours etc
C. Liquid measuring cups – you can measure milk etc
D. Weighing scales – baking is all about weight rations. If you use a scale, you know that you are spot on
E. Bowls – don’t mix up with your cooking bowls
F. Cake pans – I prefer light colour pan because they are less to burn the cake; however, if you have the darker pans; make sure you drop the oven temperature by 10 degrees and keep eyes half way through
G. Electronic mixers – it is a huge help to cream the butter until pale and fluffy
H. Sifter - sifting breaks up clumps, adds air to the flour which helps produce lighter cakes and makes measurements more uniform
I. Oven thermometer – temperatures can be checked to insure it remains consistent throughout the baking time.

3. Prepare Ingredients:
As a home baker, I have most fine ingredient from the speciality shops or importers instead of the local supermarkets. The quality of the ingredients you use will determine the final taste of the cake. Although the fine ingredients for baking normally sell on a huge quantity through the importers, you will be able to find the small quantity in the local speciality shops. They are expensive but it’s worth to invest. After all, this is a delicious cake for you and your loved ones. You want them to be healthy and satisfied.

Ingredients For This Recipe

* Mum Goodwin’s Chocolate Cake –
125g cocoa power (Callebut cocoa powder or Organic cocoa powder)
375ml hot water (do I need to say more)
180g unsalted butter (Western Star) – Soften [room temperature]
550g caster sugar (CSR and do not use white sugar)
185ml milk (Pauls and use only full cream) – [room temperature]
2 teaspoons of vinegar (I use apple cider vinegar)
½ teaspoon salt (fine pink salt just personal reference)
450g self-raising flour (I use white wings or organic flour)
3 eggs (free range and 70g each egg) – [room temperature]

* Dark Chocolate Glaze –
5g of dark chocolate (Callebut)
150ml boiled cream

4. Steps:
After years in the baking wilderness and learnt the tricks of the trade from many top pastry chefs; let’s take some actions now.

a. Preheat the oven 160 degrees fan force
b. Liquid measuring cup – stir cocoa powder and hot water together; set it aside to cool
c. A bowl – Sift salt and self-raising flour together (I run out of the unsalted butter so I use the salted butter; so simply I just need to sift the flour only)
d. Another liquid measuring cup – combine milk and apple cider vinegar
e. Mixer bowl – cream butter and sugar on a medium speed until pale and fluffy (if you don’t have the scraper beater, make sure you scrape the sides of the bowl, this prevents the chunk butter stays underneath) It takes times to complete this stage; so be patient
    i. Beat in one egg at a time on a medium speed (mix well before add the next egg)
    ii. Beat in 1/3 of flour mixture and beat on the low speed
    iii. Beat in ½ of milk mixture
    iv. Repeat with the remaining flour and milk mixtures
v. Finally, stir in the chocolate mixture
f. Cake tin – I use the bundt cake pan; I use the cake release spray to enable me to release the cake easier later. Pour the mixture into the cake tin. I want to do something naughty. I add the “Caramello” chocolate in the batter.
g. Oven – Place the cake tin in the centre of the oven for 45 minutes according to the recipe. The early sign to see if the cake is well cooked is that the cake pulls away from the sides of the pan and when you touched it; it springs back. You can also check it with the cake tester. The tester comes out clean means its ready.
h. Cool off – Cool the cake in the tin for 5 minutes and leave it to cool down completely on the cake cooling rack.
i. Chocolate Glaze
    i. Pour boiled cream over chocolate and stir until combined and glossy
    ii. Leave to cool at room temperature

5. Presentation:
This is what you are waiting for with all the hard works. Place your cake on the cake stand or a beautiful plate. Pour the chocolate glaze over the cake.
It’s time to cut it, serve it and eat it.

Thank you for stopping by!
Happy baking~
Beth xoxo

21 July 2011

Dessert Table


Caramel Heaven Dessert Table
Salad Bar & Drink Station
  
I have celebrated my 33rd birthday with 15 beloved family and friends last night. It was a magical night. The party was last until nearly midnight from 5:30PM. It was this fun. Hubby did a good job on bringing out some good steaks, lamb chops etc.

I think a backyard barbecue is more casual by nature and allows my guests to hang out and relax. I also served three types of salad. Young guests was simply easy to please by playing my baby niece's toys and some balloons.

Here is my first dessert table. It's called "Caramel Heaven" due to its colour scheme. I have several desserts made by the super yummy Belgian Caramel Chocolate.

This year, I don’t have a theme, so a dessert table can bring a sweet touch to it. After all, what could be sweeter than sharing sweet memories together with your close family and friends?

Here is how I prepared it!


Cake and Desserts: baking mama
1. Caramel Milkshake
2. My Handbag Birthday Cake
3. Allergy Free Chocolate Cake Pops
4. Pocky Strawberry
5. Chocolate Dipped Strawberries
6. Mini Choc Mudcake Cupcakes & Caramel Choc Ganache
7. Milk Chocolate Mousse in a shot
8. Raspberry Mousse Chocolate Cups
9. Lemony Whoopie Pies
10 Mudcake Cupcake Favours
Homemade Desserts
All desserts were gone before the night ended. Every treat is a winner. There is the most asked one which was the "whoopie pie" because no one knew what it was before the party and they loved it.

Stands and Jars: baking mama
Favours: baking mama
Monogram Wall Decal: Janey Mac through Etsy.Com
Pom Poms: Ah-Tissues
Fabric: white table linen and tulle from Spotlight

Drink Station:

I am always thinking the less the better but when it comes to take the actions; it’s always the other way around. Since I have a dessert table, I guess there is no harm to have a drink station. It is small due to the numbers of the guest. According to the expert, it is to avoid congestion in one area and to keep the guests mixing.
Labels: Our Sweet Events
Drink Cooler: IKEA

Well, I guess this is it. I can't wait to plan my next party. Hands up if that's you.
Happy birthday to me. :)

Thank you for stopping by!
Happy celebrating~
Beth xoxo

23 June 2011

Weekend Project: Macarons

I thought I would never make any macarons again. They are very delicated sweets and extremely hard to make for sure.

My brother in law's birthday is coming soon. I gave the challenge a go again. Here they are. The basic recipe - Almond Macarons with Dark Chocolate Ganache Filling. What do you think?

Time to dress them into a present.

Standard Almond Macarons (size as shown in the photo) - $1.50 each

Happy baking~
Beth xoxo

20 June 2011

Hot Chocolate Spoon

The weather is now good for a good cup of hot chocolate. Stir this treat into your warm milk for your hot chocolate.

We have three flavours available:
1. Dark Chocolate (as shown)
2. Milk Chocolate
3. Strawberry Chocolate

We use the brand new "berry mashmellow". It's simply a lovely combo.
Price: $2.50 each

Later on, the beautiful spoon edition will be out for $3.50 each. Stay tuned~

Happy drinking~
Beth xoxo

09 June 2011

Tree Stump Cake


An enchanted forest party theme creates a magical atmosphere for a birthday celebration. While this theme is especially nice for a little girl's birthday party, it can also be modified to use for boys or adults.

This is a smaller cake for a birthday celebration for Paul and I. A tree stump surrounded by flowers and woodland creatures is one simple idea for an enchanted forest party. Five round cakes stacked on top of one another create the main part of the stump.

The flavour of the cake is the "Hershey Dark Chocolate Cake".


We had a wonderful, romantic and relaxing time at the "Secrets on the Lake" in Montville. Secrets treehouses, nestled on the shores of peaceful Lake Baroon in Queensland's Sunshine Coast hinterland, offers you the very best in intimate accommodation.

Finishing off the enchanted party with a themed cake creates a sweet ending to the celebration. Try your hand at creating one of these imaginative forest-themed cakes to make your next birthday occasion unforgettable.

Happy baking!
Thank you for stopping by.

Beth xoxo


Fire Engine Cupcakes

  Fun cupcakes to celebrate a little fireman turning 3 last July. Vanilla buttermilk cupcakes with vanilla buttercream frosting and gum pas...